作为一个完成的应用程序,数据存储操作是必不可少的。因此,Android系统一共提供了四种数据存储方式。分别是:SharePreference、SQLite、Content Provider和File。由于Android系统中,数据基本都是私有的的,都是存放于“data/data/程序包名”目录下,所以要实现数据共享,正确方式是使用Content Provider
adb shell //进入emulator 环境
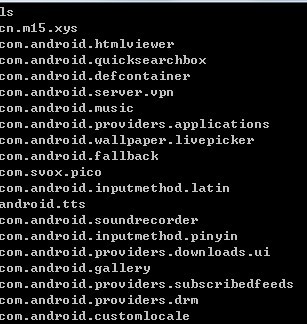
cd /data/data
ls
SQLite: SQLite是一个轻量级的数据库,支持基本SQL语法,是常被采用的一种数据存储方式。Android为此数据库提供了一个名为SQLiteDatabase的类,封装了一些操作数据库的API。
SharedPreference: 除SQLite数据库外,另一种常用的数据存储方式,其本质就是一个xml文件,常用于存储较简单的参数设置。
File: 即常说的文件(I/O)存储方法,常用语存储大数量的数据,但是缺点是更新数据将是一件困难的事情。
ContentProvider: Android系统中能实现所有应用程序共享的一种数据存储方式,由于数据通常在各应用间的是互相私密的,所以此存储方式较少使用,但是其又是必不可少的一种存储方式。例如音频,视频,图片和通讯录,一般都可以采用此种方式进行存储。每个Content Provider都会对外提供一个公共的URI(包装成Uri对象),如果应用程序有数据需要共享时,就需要使用Content Provider为这些数据定义一个URI,然后其他的应用程序就通过Content
Provider传入这个URI来对数据进行操作。
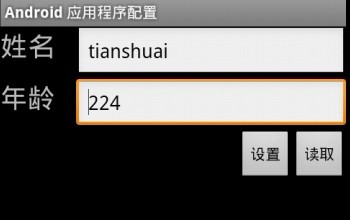
一:使用SharedPreferences存储数据
首先说明SharedPreferences存储方式,它是Android提供的用来存储一些简单配置信息的一种机制,例如:登录用户的用户名与密码。其采用了Map数据结构来存储数据,以键值的方式存储,可以简单的读取与写入,具体实例如下:
package tianshuai.AndroidSharedPreferences;

import android.app.Activity;
import android.content.Context;
import android.content.SharedPreferences;
import android.content.SharedPreferences.Editor;
import android.os.Bundle;
import android.view.View;
import android.view.View.OnClickListener;
import android.widget.Button;
import android.widget.EditText;
import android.widget.Toast;

public class AndroidSharedPreferences extends Activity {

         private static final String TAG = "AndroidSharedPreferences";
         private EditText etName;
         private EditText etAge;


         /** Called when the activity is first created. */

         @Override
         public void onCreate(Bundle savedInstanceState) {

                   super.onCreate(savedInstanceState);
                   setContentView(R.layout.main);

                   Button btSet = (Button) this.findViewById(R.id.bt_set);
                   Button btRead = (Button) this.findViewById(R.id.bt_read);
                   etName = (EditText) this.findViewById(R.id.et_name);
                   etAge = (EditText) this.findViewById(R.id.et_age);

                   btSet.setOnClickListener(new OnClickListener() {
                            @Override
                            public void onClick(View v) {

                                     // 获取名称和年龄
                                     String name = etName.getText().toString();
                                     String age = etAge.getText().toString();

                                     // 创建SharedPreferences
                                     SharedPreferences sp = getSharedPreferences("preferences",Context.MODE_PRIVATE);

                                     // 添加数据
                                     Editor editor = sp.edit();
                                     editor.putString("name", name);
                                     editor.putInt("age", Integer.parseInt(age));
                                     // 保存数据
                                     if (editor.commit())
                                               Toast.makeText(AndroidSharedPreferences.this,R.string.save_success, 1).show();
                                     else
                                               Toast.makeText(AndroidSharedPreferences.this,R.string.save_failed, 1).show();

                            }

                   });

                   btRead.setOnClickListener(new OnClickListener() {

                            @Override
                            public void onClick(View v) {
                                     // 创建SharedPreferences
                                     SharedPreferences sp = getSharedPreferences("preferences",Context.MODE_PRIVATE);
                                     // 获取数据
                                     String name = sp.getString("name", "defName");
                                     String age = sp.getInt("age", 0) + "";
                                     // 显示数据
                                     etName.setText(name);
                                     etAge.setText(age);
                            }
                   });
         }
}
main.xml
<?xml version="1.0" encoding="utf-8"?>

<LinearLayout xmlns:android="http://schemas.android.com/apk/res/android"
         android:orientation="vertical" android:layout_width="fill_parent"
         android:layout_height="fill_parent">

         <!-- 姓名 -->
         <RelativeLayout android:layout_width="fill_parent"
                   android:layout_height="wrap_content">
                   <TextView android:layout_width="70dip" android:layout_height="wrap_content"
                            android:textSize="25dip" android:id="@+id/tv_name" android:text="@string/tv_name" />
                   <EditText android:layout_width="300dip"
                            android:layout_height="wrap_content" android:layout_toRightOf="@id/tv_name"
                            android:id="@+id/et_name" />
         </RelativeLayout>
         <!-- 年龄 -->
         <RelativeLayout android:layout_width="fill_parent"
                   android:layout_height="wrap_content">
                   <TextView android:layout_width="70dip" android:layout_height="wrap_content"
                            android:textSize="25dip" android:id="@+id/tv_age" android:text="@string/tv_age" />
                   <EditText android:layout_width="300dip"
                            android:layout_height="wrap_content" android:layout_toRightOf="@id/tv_age"
                            android:id="@+id/et_age" />
         </RelativeLayout>
         <!-- 按钮 -->
         <RelativeLayout android:layout_width="fill_parent"
                   android:layout_height="wrap_content" android:gravity="right">
                   <Button android:layout_width="wrap_content"
                            android:layout_height="wrap_content" android:text="@string/bt_write"
                            android:id="@+id/bt_set" />
                   <Button android:layout_width="wrap_content"
                            android:layout_height="wrap_content" android:layout_toRightOf="@id/bt_set"
                            android:text="@string/bt_read" android:id="@+id/bt_read" />
         </RelativeLayout>
</LinearLayout>
strings.xml
<?xml version="1.0" encoding="utf-8"?>
<resources>
    <string name="hello">Hello World, AndroidSharedPreferences!</string>
    <string name="app_name">Android 应用程序配置</string>
   <string name="tv_name">姓名</string>
    <string name="tv_age">年龄</string>
    <string name="bt_write">设置</string>
    <string name="bt_read">读取</string>
    <string name="save_success">保存成功</string>
    <string name="save_failed">保存失败</string>
</resources>
我们为”/data/data/com.changcheng.sharedpreferences/shared_prefs/preferences.xml”。将 preferences.xml导出,查看它的内容为:
adb pull /data/data/com.changcheng.sharedpreferences/shared_prefs/preferences.xml /usr/aa
<?xml version='1.0' encoding='utf-8' standalone='yes' ?>
<map>
<string name="name">长城</string>
<int name="age" value="25" />
</map>
关键代码:
void    WriteSharedPreferences(String strName,String strPassword)
{
      SharedPreferences user = getSharedPreferences(“user_info”,0);
      uer.edit();
      user.putString(“NAME”,strName);
      user.putString(“PASSWORD”,strPassword);
      user.commit();
}
void   ReadSharedPreferences()
{
      StringstrName,strPassword;
      SharedPreferences user = getSharedPreferences(“user_info”,0);
      strName= user.getString(“NAME”,””);
      strPassword= user getString(“PASSWORD”,””);
}
数据读取与写入的方法都非常简单,只是在写入的时候有些区别:先调用edit()使其处于编辑状态,然后才能修改数据,最后使用commit()提交修改的数据。实际上SharedPreferences是采用了XML格式将数据存储到设备中,在DDMS中的FileExplorer中的/data/data/<packagename>/shares_prefs下。使用SharedPreferences是有些限制的:只能在同一个包内使用,不能在不同的包之间使用。
二:文件存储数据
文件存储方式是一种较常用的方法,在Android中读取/写入文件的方法,与Java中实现I/O的程序是完全一样的,提供了openFileInput()和openFileOutput()方法来读取设备上的文件。具体实例如下:
Stringfn = “moandroid.log”;
FileInputStreamfis = openFileInput(fn);
FileOutputStreamfos = openFileOutput(fn,Context.MODE_PRIVATE);
具体操作详见博文:http://blog.csdn.net/tianshuai11/article/details/7426340
三:SQLite
具体操作详见博文:http://blog.csdn.net/tianshuai11/article/details/7435501
四:ContentProvider
1)ContentProvider简介
当应用继承ContentProvider类,并重写该类用于提供数据和存储数据的方法,就可以向其他应用共享其数据。虽然使用其他方法也可以对外共享数据,但数据访问方式会因数据存储的方式而不同,如:采用文件方式对外共享数据,需要进行文件操作读写数据;采用sharedpreferences共享数据,需要使用sharedpreferencesAPI读写数据。而使用ContentProvider共享数据的好处是统一了数据访问方式。
2)Uri类简介
Uri代表了要操作的数据,Uri主要包含了两部分信息:1.需要操作的ContentProvider,2.对ContentProvider中的什么数据进行操作,一个Uri由以下几部分组成:
1>scheme:ContentProvider(内容提供者)的scheme已经由Android所规定为:content://…
2>主机名(或Authority):用于唯一标识这个ContentProvider,外部调用者可以根据这个标识来找到它。
3>路径(path):可以用来表示我们要操作的数据,路径的构建应根据业务而定,如下:
要操作contact表中id为10的记录,可以构建这样的路径:/contact/10
要操作contact表中id为10的记录的name字段,contact/10/name
要操作contact表中的所有记录,可以构建这样的路径:/contact?
要操作的数据不一定来自数据库,也可以是文件等他存储方式,如下:
要操作xml文件中contact节点下的name节点,可以构建这样的路径:/contact/name
如果要把一个字符串转换成Uri,可以使用Uri类中的parse()方法,如下:
Uri uri =Uri.parse("content://com.changcheng.provider.contactprovider/contact")
3)UriMatcher、ContentUrist和ContentResolver简介
因为Uri代表了要操作的数据,所以我们很经常需要解析Uri,并从Uri中获取数据。Android系统提供了两个用于操作Uri的工具类,分别为UriMatcher和ContentUris。掌握它们的使用,会便于我们的开发工作。
UriMatcher:用于匹配Uri,它的用法如下:
1>首先把你需要匹配Uri路径全部给注册上,如下:
UriMatcher uriMatcher = new UriMatcher(UriMatcher.NO_MATCH);//常量UriMatcher.NO_MATCH表示不匹配任何路径的返回码(-1)。
//如果match()方法匹配content://com.changcheng.sqlite.provider.contactprovider/contact路径,返回匹配码为1
uriMatcher.addURI(“com.changcheng.sqlite.provider.contactprovider”,“contact”, 1);//添加需要匹配uri,如果匹配就会返回匹配码
//如果match()方法匹配content://com.changcheng.sqlite.provider.contactprovider/contact/230路径,返回匹配码为2
uriMatcher.addURI(“com.changcheng.sqlite.provider.contactprovider”,“contact/#”, 2);//#号为通配符
2>注册完需要匹配的Uri后,就可以使用uriMatcher.match(uri)方法对输入的Uri进行匹配,如果匹配就返回匹配码,匹配码是调用addURI()方法传入的第三个参数,假设匹配content://com.changcheng.sqlite.provider.contactprovider/contact路径,返回的匹配码为1。
ContentUris:用于获取Uri路径后面的ID部分,它有两个比较实用的方法:
withAppendedId(uri,id)用于为路径加上ID部分
parseId(uri)方法用于从路径中获取ID部分
ContentResolver:当外部应用需要对ContentProvider中的数据进行添加、删除、修改和查询操作时,可以使用ContentResolver类来完成,要获取ContentResolver对象,可以使用Activity提供的getContentResolver()方法。ContentResolver使用insert、delete、update、query方法,来操作数据。
分享到:


相关推荐
该资源包含了一个android实现的数据存储,包含了利用:sharedpreference,file,sqlite,网络存储的四种方法,简单易懂。
熟悉android五种数据存储方式,可以分别看到这五种数据存储过程
数据存储方式有三种:一个是文件,一个是数据库,另一个则是网络。其中文件和数据库可能用的稍多一些,文件用起来较为方便,程序可以自己定义格式;数据库用起稍烦锁一些,但它有它的优点,比如在海量数据时性能优越...
android数据存储方式大全android数据存储方式大全android数据存储方式大全android数据存储方式大全android数据存储方式大全android数据存储方式大全
Android项目开发中使用的数据存储方式有:网络存储、sqlite存储、File存储和SharedPreferences存储,四种存储方式对应的Demo别人是NetworkDemo、SqliteDemo、FileDemo和SharedPreferencesDemo,根据应用的场景选择...
SharedPreference是一种轻型的数据存储方式,实际上是基于XML文件存储的“key-value”键值对数据。通常用来存储程序的一些配置信息。其存储在“data/data/程序包名/shared_prefs目录下。 SharedPreference本身
2.掌握各种文件存储的区别与适用情况; 3.了解SQLite数据库的特点和体系结构; 4.掌握SQLite数据库的建立和操作方法; 5.理解ContentProvider的用途和原理; 6.掌握ContentProvider的创建与使用方法。 源码和整个...
Android 数据存储方式
在上一篇《Android开发之数据存储的四种方式之一:SharedPreferences》中介绍了SharedPreferences存储本地数据的应用,在这个案例里,封装了HttpURLConnection请求、HttpClient请求和AsyncHttpClient请求,将需要...
Android 3种数据保存(SharedPreferences存储 内部文件存储 数据库存储),如项目包有问题请联系我谢谢
Android数据存储 Android数据存储
android数据访问与存储 简单的易懂
android 数据存储 我测试需要看的 不需要就不要看啦。
这里简单的介绍了安卓存储数据的四大方式,大家可以下载来看看
Android数据存储五种方式总结[借鉴].pdf
在android平台上应用数据存储的方法全集。
Android数据基本存储方式 SharedPreference SQL基本语句 SharedPreference SQLite 文件 内容提供者ContentProvider 网络存储
Android实现数据存储技术,JDBC连接数据库明细
Android数据存储(内置sdcard)案例1
Android实验数据存储SQLite