在WPF应用的开发过程中Binding是一个非常重要的部分。
在实际开发过程中Binding的不同种写法达到的效果相同但事实是存在很大区别的。
这里将实际中碰到过的问题做下汇总记录和理解。
1.source ={binding} 和source = {binding RelativeSource={RelativeSource self},Path=DataContext}效果相同
理解:{binding} 不设定明确的绑定的source,这样binding就去从本控件类为开始根据可视树的层次结构自下而上查找不为空的Datacontext属性的值。
{binding RelativeSource={RelativeSource self},Path=DataContext}中RelativeSource self的含义为绑定的source为控件自身,这样binding 就绑定了自身控件的Datacontext。
效果:
<StackPanel DataContext="abc">
<Label Content="{Binding}"></Label>
<Label Content="{Binding RelativeSource={RelativeSource Self},Path=DataContext}"></Label>
</StackPanel>

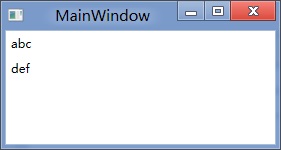
<StackPanel DataContext="abc">
<Label Content="{Binding}"></Label>
<Label DataContext="def" Content="{Binding RelativeSource={RelativeSource Self},Path=DataContext}"></Label>
</StackPanel>
2.在Template的Trigger中改变Template中某个样式控件的属性
<Style TargetType="{x:Type Button}">
<Setter Property="Template">
<Setter.Value>
<ControlTemplate TargetType="{x:Type Button}">
<Border>
<Label x:Name="PART_Label" Content="{TemplateBinding ContentA}" />
</Border>
<ControlTemplate.Triggers>
<Trigger Property="IsChecked" Value="True">
注:
<Setter TargetName="PART_Label" Property="Content" Value="{Binding Path=ContentB, RelativeSource={RelativeSource TemplatedParent}}" />
</Trigger>
</ControlTemplate.Triggers>
</ControlTemplate>
</Setter.Value>
</Setter>
</Style>
当然把注:的这句改成<Setter
TargetName="PART_Label" Property="Content" Value="{Binding Path=ContentB,RelativeSource={RelativeSourceAncestorType={x:TypeButton}}}">效果一样。
先写到这,下篇继续关注Binding中ElementName,RelativeSource,Source的相同点和区别。
转载时,请注明本文来源:www.cnblogs.com/tmywu
分享到:


相关推荐
WPF的binding代码实例 总结的几个binding的基础运用
WPF Binding绑定 对象和view的绑定 界面修改直接改变对象的修改 Command命令 事件的绑定 基础学习源码
wpf binding 的两种方法 数据库连接 并显示的两种方法
WPF Binding转换与校验
WPF Binding,里面有源代码,值得初学者学习
Part 3: WPF Data Binding with LINQ to SQL These tutorials describe how to map your classes to your tables manually (rather than with an automated tool like SqlMetal) so that you can have support for M...
快速掌握 WPF Data Binding 的要訣
wpf界面设计技巧,希望对大家有些帮助哦,哈哈。
WPF Binding 学习笔记
wpfwpf关于Binding的wpfwpf关于Binding的wpfwpf关于Binding的wpfwpf关于Binding的
WPF值绑定转换测试
WPF中DataGrid自定义实现最后一行下面跟一个汇总行,类似MT4
WPF ComboBox的LostFocus绑定Command,其他事件同理实现。
wpf入门第二篇 MVVM与binding的示例代码,详情可以查看博主的这篇博客: https://blog.csdn.net/wf824284257/article/details/88758707
wpf 绑定的内容整理,绑定的源:Elementname,Source,RelativeSource,DataContext,分别得介绍,Mode介绍,UpdateSourceTrigger介绍,其中夹杂各种例子
WPF中DataGrid得到其中一行的值
WPF中的FrameworkElement存在两个属性,Height和ActualHeight。 其中ActualHeight表示的是元素重绘制后的尺寸,并且是只读的。也就是说其始终是真实值。 而Height属性,是可读写的,并且有如下特性: (1)Height...
WPF中Image控件Source属性的相对路径和绝对路径问题的开发经验总结,亲测通过!
wpf的小实例,绑定类,很简单,初学者可以看一看