- жµПиІИ: 12920905 жђ°
- жАІеИЂ:

- жЭ•иЗ™: е§ІињЮ
-

жЦЗзЂ†еИЖз±ї
з§ЊеМЇзЙИеЭЧ
- жИСзЪДиµДиЃѓ ( 0)
- жИСзЪДиЃЇеЭЫ ( 0)
- жИСзЪДйЧЃз≠Ф ( 0)
е≠Шж°£еИЖз±ї
- 2013-03 ( 14)
- 2013-02 ( 88)
- 2013-01 ( 196)
- жЫіе§Ъе≠Шж°£...
жЬАжЦ∞иѓДиЃЇ
-
sanrenxing_1пЉЪ
GoEasy еЃЮжЧґжО®йАБжФѓжМБIE6-IE11еПКе§Іе§ЪжХ∞дЄїжµБжµПиІИеЩ®зЪД ...
WindowsPhoneжґИжБѓжО®йАБжЬНеК° -
еЉ†з†ЪиЊЙпЉЪ
дЄ§дЊІзЕІзЙЗзїХYиљіжЧЛиљђеРОжЬЙйФѓйљњпЉМиѓЈйЧЃйФѓйљњиІ£еЖ≥жЦєж°ИпЉМеЊИйХњжЧґйЧіж≤°иІ£еЖ≥
иЗ™еЃЪдєЙеЄ¶еАТељ±еТМеБПиљђзЪДиґЕзВЂGallery -
knight_black_bobпЉЪ
иГљдЄНиГљжККдљ†иЗ™еЈ±зЪДеНЪеЃҐжХізРЖдЄЛеИЖз±їдЄЛпЉМеЖЩдЇЖињЩдєИе§Ъ пЉМйГљдЄНзЯ•йБУжАОдєИжЯ• ...
Android_View,ViewGroup,WindowдєЛйЧізЪДеЕ≥з≥ї -
jeasonyoungпЉЪ
дљ†ињЩдЄ™дї£з†БеЃЮзО∞еЬ®iOS8дЄЛеЇФиѓ•жШѓжїСдЄНеК®зЪД
UISlider жїСеЭЧжОІдїґвАФIOSеЉАеПС -
wx_helloпЉЪ
е¶ВжЮЬиГљеЖЩдЄ™еПѓињРи°МзЪДjavaз®ЛеЇПпЉМдЄНиГЬжДЯжњАгАВгАВгАВ
rs232дЄ≤еП£йАЪдњ°еОЯзРЖ
Windows PhoneеЉАеПСпЉИ48пЉЙпЉЪдЄНеПѓжИЦзЉЇзЪДжЬђеЬ∞жХ∞жНЃеЇУ
дєЯиЃЄWP7зЪДжЧґеАЩпЉМжШѓжГ≥зЭАиЃ©дЇСжЬНеК°йЬ≤дЄ§жЙЛпЉМжХЕдЉЉдєОеєґдЄНжФѓжМБжЬђеЬ∞жХ∞жНЃеЇУпЉМжЙАжЬЙжХ∞жНЃйГљдЄКдЉ†дЄКвАЬдЇСвАЭжХ∞жНЃеЇУдЄ≠гАВдЄНињЗеСҐпЉМеЬ®SDK 7.1еРОпЉМеПИеК†ињЫдЇЖжЬђеЬ∞жХ∞жНЃеЇУеКЯиГљгАВ
ињЩдЄ™жЬђеЬ∞жХ∞жНЃеЇУзЪДжУНдљЬпЉМдЄОжИСдїђеє≥еЄЄеЬ®WindowsFormжИЦWPFй°єзЫЃдЄ≠жЙАдљњзФ®жХ∞жНЃеЇУзЪДжГЕеЖµжЬЙдЇЫдЄНдЄАж†ЈпЉЪдЄАиАЕж≤°жЬЙеی嚥еМЦзЪДиЃЊиЃ°еЩ®пЉЫдЇМжЭ•дЄНдљњзФ®SQLиѓ≠еП•гАВ
йВ£дєИпЉМдљ†дЄАеЃЪдЉЪйЧЃпЉЪвАЬйВ£зФ®дїАдєИжЭ•е§ДзРЖдЄОжХ∞жНЃеЇУзЪДдЇ§дЇТпЉЯвАЭ
дЄНзЯ•йБУеРДдљН.NETеЯЇз°Ае≠¶еЊЧжАОдєИж†ЈпЉМе¶ВжЮЬдљ†зЪДеЯЇз°АжѓФиЊГжЙОеЃЮпЉМдЄАжПРеИ∞дЄНдљњзФ®SQLиѓ≠еП•дєЯиГљжУНдљЬжХ∞жНЃеЇУпЉМдљ†е§ІиДСйЗМиВѓеЃЪйЧ™еЗЇдЄАйБУдЇЃеЕЙпЉМдљ†дЄАеЃЪжГ≥еИ∞дЇЖгАВ
еѓєеХКпЉМе∞±жШѓйВ£дЄ™еЊИжЬЙиґ£еЊИе•љзО©зЪДLINQпЉМжШѓеХКпЉМLINQжШѓдїАдєИпЉМдЉ∞иЃ°дЄНзФ®жИСдїЛзїНдЇЖпЉМжЦ∞еПСжШОпЉМељУзДґдєЯдЄНжЦ∞дЇЖпЉМеСµеСµгАВ
йВ£дєИпЉМжИСдїђеЇФиѓ•ињШиЃ∞еЊЧLinq to SQLињЩдЄ™дЄЬи•њпЉМеРДдљНеЬ®еЕґдїЦй°єзЫЃдЄ≠дЄАеЃЪзО©еЊЧеЊИзЖЯпЉМжАОдєИзО©зЪДеСҐпЉЯжИСжЭ•еЄЃе§ІеЃґеЫЮењЖдЄАдЄЛеРІгАВеЬ®VSйЗМйЭҐжЙУеЉАдЄАдЄ™жХ∞жНЃеЇУпЉМжЦ∞еїЇдЄАдЄ™LINQ to SQLз±їпЉМзДґеРОжККжХ∞жНЃеЇУдЄ≠зЪДи°®жЛЦеИ∞иЃЊиЃ°з™ЧеП£пЉМеЃЮйЩЕдЄКпЉМе∞±зФЯжИРдЇЖдЄАдЄ™дЄ™еЃЮдљУз±їдЇЖгАВе¶ВдљХпЉЯжЬЙеН∞и±°еРІпЉМе¶ВжЮЬж≤°жЬЙпЉМеѓєдЄНиµЈпЉМеЫЮеОїе§Ндє†гАВ
DataContextз±їдЉЪ襀眿иѓСдЄЇвАЬжХ∞жНЃдЄКдЄЛжЦЗвАЭпЉМиѓїиµЈжЭ•жШѓдЄНжШѓжЬЙдЇЫиОЂеРНеЕґе¶ЩпЉМдЄНзЃ°еЃГпЉМдљ†е∞±жККеЃГељУжИРжШѓжХ∞жНЃеЇУзЪДдЄАдЄ™дї£зРЖпЉМе∞±е•љеГПзЬЛеИ∞еЃГе∞±зЬЛеИ∞жХ∞жНЃеЇУдЄАж†ЈпЉЫе∞±е•љжѓФжЯРдЇЇзЪДзЕІзЙЗдЄАж†ЈпЉМзЬЛеИ∞зЕІзЙЗдљ†е∞±жГ≥иµЈе•єгАВ
дєЯеПѓдї•зРЖиІ£дЄЇпЉМдЄАдЄ™DataContextе∞±и°®з§ЇдЄАдЄ™жХ∞жНЃеЇУпЉМзДґеРОеЬ®DataContextзЪДжіЊзФЯз±їдЄ≠е£∞жШОNдЄ™еЕђеЕ±е≠ЧжЃµпЉМз±їеЮЛдЄЇTable<T>пЉМTе∞±жШѓдљ†еЃЪдєЙзЪДеЃЮдљУз±їпЉМдЄАдЄ™еЃЮдљУз±їзЪДеЃЪдєЙе∞±з≠ЙдЇОдЄАдЄ™и°®зЪДеЃЪдєЙпЉМдЄАдЄ™DataContextзЪДе≠Рз±їдЄ≠еЃЪдєЙNдЄ™Table<T>пЉМе∞±е¶ВеРМдЄАдЄ™жХ∞жНЃеЇУдЄ≠еМЕеРЂNдЄ™и°®дЄАж†ЈгАВ
жИСзЫЄдњ°пЉМеП™и¶БеѓєжККLINQеТМLINQ to SQLе≠¶еЊЧе•љпЉМеЬ®WPдЄ≠зЪДжЬђеЬ∞жХ∞жНЃеЇУжУНдљЬжШѓзїЭеѓєдЄНйЬАи¶Бе≠¶дє†жЦ∞зЯ•иѓЖзЪДгАВињЩдєЯжШѓ.NETзЪДдЄАдЄ™дЄНйФЩзЪДдЉШзВєпЉМйЂШеЇ¶йЫЖжИРзїЯдЄАгАВ
дЄНињЗеСҐпЉМињЮжО•е≠Чзђ¶дЄ≤е∞±ењЕй°їдЇЖиІ£дЄАдЄЛдЇЖпЉМжѓХзЂЯеЃГеТМеЕґдїЦй°єзЫЃдЄ≠зЪДињЮжО•е≠Чзђ¶дЄ≤жШѓдЄНеРМзЪДгАВ
йЗНзВєдЄАпЉЪжХ∞жНЃеЇУзЪДиЈѓеЊДгАВжХ∞жНЃеЇУдєЯжШѓдЄАдЄ™жЦЗдїґпЉМеЫ†ж≠§пЉМеЃГиВѓеЃЪдєЯжЬЙдњЭе≠ШиЈѓеЊДпЉМжИСдїђзЯ•йБУWPжШѓдљњзФ®зЛђзЂЛе≠ШеВ®зЪДпЉМжЙАдї•пЉМдЄАиИђжГЕеЖµдЄЛпЉМжИСдїђдЉЪеЬ®зЛђзЂЛе≠ШеВ®дЄ≠еИЫеїЇжХ∞жНЃеЇУгАВељУзДґпЉМиЈѓеЊДжЬЙдЄ§зІНпЉЪ
пЉИ1пЉЙдї•appdataеЉАе§ізЪДпЉМе¶Вappdata:/abc.sdfпЉМжДПжАЭе∞±жШѓеЇФзФ®з®ЛеЇПеЃЙи£ЕеМЕйЗМйЭҐзЪДжЦЗдїґпЉИе¶ВXAPжЦЗдїґпЉЙпЉМињЩзІНжГЕеЖµдЄНжО®иНРпЉМеЫ†дЄЇжИСдїђеП™иГљйАЪињЗдї£з†БжЭ•еИЫеїЇжХ∞жНЃеЇУзЪДпЉМиАМжЈїеК†еИ∞VSй°єзЫЃдЄ≠зЪДжХ∞жНЃеЇУжЦЗдїґдЄАиИђжШѓдїОзЛђзЂЛе≠ШеВ®еМЇдЄ≠жПРеПЦзЪДпЉМдљЖжИСдїђдЄН姙ењЕи¶БињЩж†ЈеБЪгАВ
пЉИ2пЉЙдї•isostoreеЉАе§ізЪДпЉМе¶Вisostore:/abc.sdfпЉМињЩжМЗз§ЇжХ∞жНЃеЇУдљНдЇОзЛђзЂЛе≠ШеВ®з©ЇйЧідЄ≠гАВ
е¶ВжЮЬеРДдљНиІЙеЊЧињЩдЇЫдЄЬ蕜姙е§НжЭВпЉМжИСзїЩе§ІеЃґдЄ§дЄ™ињЮжО•е≠Чзђ¶дЄ≤пЉМеЯЇжЬђдЄКеПѓдї•йАЪињЗпЉМе¶ВжЮЬж≤°жЬЙзЙєжЃКйЬАи¶БпЉМдЊИзЫіжО•зЕІжКДпЉМзДґеРОжККзЫЄеЕ≥зЪДеПВжХ∞жФєдЄАдЄ™е∞±жШѓдЇЖгАВ
зђђдЄАжЭ°пЉЪдЄНеЄ¶еѓЖз†БзЪДпЉЪ
isostore:/database.sdf
ињЩдЄ™е§ЯзЃАеНХеРІпЉМе¶ВжЮЬдЄНеЄ¶еѓЖз†БпЉМе∞±ињЩеП•е∞±е§ЯпЉМзїЭеѓєдЄЗиГљзЪДпЉМеЕґдЄ≠пЉМdatabase.sdfжШѓжЦЗдїґеРНпЉМињЩдЄ™еШЫпЉМдљ†иЗ™еЈ±еЦЬ搥гАВ
зђђдЇМжЭ°пЉЪеЄ¶еѓЖз†БзЪДпЉМжЬАе•љи¶БжЬЙеѓЖз†Б
Data Source='isostore:/database.sdf';Password='123456789'
дЄНе§ЪиѓіпЉМе∞±жШѓе§ЪдЇЖдЄАдЄ™еѓЖз†БиАМеЈ≤гАВ
зФ®ињЩдЄ§жЭ°пЉМеЯЇжЬђеПѓдї•иµ∞йБН姩дЄЛдЇЖгАВ
ж≤°жЬЙдЊЛе≠РжШѓдЄНи°МзЪДпЉМжО•дЄЛжЭ•пЉМжИСдїђзФ®еЃЮдЊЛеОїиѓіжШОпЉМињЩдЄ™еЃЮдЊЛеЖЕеЃєдЄНе∞СгАВ
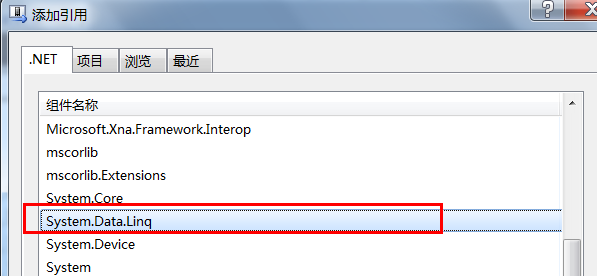
еЬ®дљ†жЦ∞еїЇWPй°єзЫЃеРОпЉМеЬ®вАЬиІ£еЖ≥жЦєж°ИиµДжЇРзЃ°зРЖеЩ®вАЭдЄ≠еП≥еЗївАЬеЉХзФ®вАЭпЉМжЈїеК†еЉХзФ®пЉМеєґжЙЊеИ∞вАЬSystem.Data.LinqвАЭгАВ
зђђдЄАйГ®еИЖпЉМеЕИеЖЩе•љдЄОжХ∞жНЃеЇУжЬЙеЕ≥зЪДйАїиЊСгАВ
using System;
using System.Net;
using System.Windows;
using System.Windows.Controls;
using System.Windows.Documents;
using System.Windows.Ink;
using System.Windows.Input;
using System.Windows.Media;
using System.Windows.Media.Animation;
using System.Windows.Shapes;
using Microsoft.Phone.Data.Linq;
using System.Data.Linq;
using System.Data.Linq.Mapping;
using System.ComponentModel;
namespace MyApp
{
public class MyDataContext : DataContext
{
/// <summary>
/// ињЮжО•е≠Чзђ¶дЄ≤
/// </summary>
public const string ConnectionString = "Data Source='isostore:/MyDb.sdf';Password='123456'";
/// <summary>
/// жЮДйА†еЗљжХ∞
/// </summary>
public MyDataContext() : base(ConnectionString) { }
public Table<Students> Students;
}
[Table]
public class Students : INotifyPropertyChanged, INotifyPropertyChanging
{
string _stuNo;
/// <summary>
/// е≠¶еПЈ
/// </summary>
[Column(CanBeNull = false, IsPrimaryKey = true)]
public string StuNo
{
get
{
return this._stuNo;
}
set
{
if (_stuNo != value)
{
OnPropertyChanging(new PropertyChangingEventArgs("StuNo"));
this._stuNo = value;
OnPropertyChanged(new PropertyChangedEventArgs("StuNo"));
}
}
}
string _name;
/// <summary>
/// еІУеРН
/// </summary>
[Column]
public string Name
{
get
{
return this._name;
}
set
{
if (_name != value)
{
OnPropertyChanging(new PropertyChangingEventArgs("Name"));
_name = value;
OnPropertyChanged(new PropertyChangedEventArgs("Name"));
}
}
}
string _email;
/// <summary>
/// зФµйВЃ
/// </summary>
[Column]
public string Email
{
get
{
return this._email;
}
set
{
if (_email != value)
{
OnPropertyChanging(new PropertyChangingEventArgs("Email"));
_email = value;
OnPropertyChanged(new PropertyChangedEventArgs("Email"));
}
}
}
public event PropertyChangingEventHandler PropertyChanging;
public event PropertyChangedEventHandler PropertyChanged;
protected void OnPropertyChanging(PropertyChangingEventArgs e)
{
if (PropertyChanging != null)
{
PropertyChanging(this, e);
}
}
protected void OnPropertyChanged(PropertyChangedEventArgs e)
{
if (PropertyChanged != null)
{
PropertyChanged(this, e);
}
}
}
}
ж≥®жДПпЉМеЃЮдљУз±їењЕй°їи¶БеЃЮзО∞INotifyPropertyChangedжО•еП£пЉМжЬАе•љињЮеРМINotifyPropertyChangingжО•еП£пЉМињЩж†ЈеПѓдї•жФєеЦДжАІиГљгАВиЃ∞дљПдЇЖпЉМдЄАеЃЪи¶БеЃЮзО∞ињЩдЄ§дЄ™жО•еП£пЉМиАМдЄФи¶БиІ¶еПСPropertyChangingеТМPropertyChangedдЇЛдїґпЉМдЄНзДґдљ†жПРдЇ§еИ∞жХ∞жНЃеЇУжШѓдЄНиГљжЫіжЦ∞жХ∞жНЃзЪДгАВ
ињЩдЄ™жИСжГ≥дЄНйЪЊжЗВпЉМеЫ†дЄЇеЬ®WPFйЗМйЭҐдєЯжШѓињЩж†ЈзЪДпЉМйЩ§йЭЮдљ†жККеЃЮдљУз±їзЪДе±ЮжАІйГљеЃЪдєЙдЄЇдЊЭиµЦй°єе±ЮжАІпЉМдљЖжЬАе•љдЄНи¶БињЩж†ЈпЉМдЊЭиµЦй°єе±ЮжАІиЩљзДґиКВзЇ¶еЖЕе≠ШпЉМдљЖжШѓеЫ†дЄЇеЃГйЬАи¶БињЫи°МеЕ®е±Аж≥®еЖМпЉМжЬЙеПѓиГљдЉЪжЛЦеїґеЇФзФ®з®ЛеЇПзЪДеРѓеК®жЧґйЧігАВ
зђђдЇМйГ®еИЖпЉМеИЫеїЇжХ∞жНЃеЇУгАВ
зЛђзЂЛе≠ШеВ®жЬђжЭ•жШѓж≤°жЬЙжХ∞жНЃеЇУзЪДпЉМжЙАдї•пЉМеЬ®зђђдЄАжђ°дљњзФ®еЇФзФ®з®ЛеЇПжЧґпЉМењЕй°їеЕИеИЫеїЇжХ∞жНЃеЇУпЉМдљ†иѓіпЉМеЬ®дїАдєИжЧґеАЩеИЫеїЇеСҐпЉЯжГ≥жЭ•жГ≥еОїпЉМињШжШѓеЬ®еЇФзФ®з®ЛеЇПз±їзЪДжЮДйА†еЗљжХ∞дЄ≠еИ§жЦ≠жХ∞жНЃеЇУжШѓеР¶е≠ШеЬ®пЉМе¶ВжЮЬдЄНе≠ШеЬ®пЉМе∞±еИЫеїЇгАВ
#region еИЫеїЇжХ∞жНЃеЇУ
using (MyDataContext dc = new MyDataContext())
{
if (dc.DatabaseExists() == false)
{
dc.CreateDatabase();
}
}
#endregion
дї•дЄКдї£з†БжШѓеЖЩеЬ®Appз±їзЪДжЮДйА†еЗљжХ∞дЄ≠гАВ
зђђдЄЙйГ®еИЖпЉМеЇФзФ®з®ЛеЇПй°µйЭҐгАВ
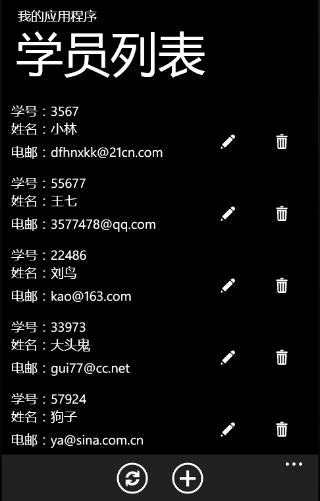
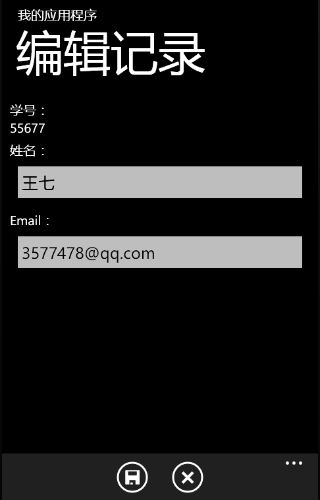
жИСдїђеБЪдЄАдЄ™зЃАеНХзЪДвАЬе≠¶еСШдњ°жБѓзЩїиЃ∞з≥їзїЯвАЭпЉМйБУеЕИеЇФзФ®з®ЛеЇПињРи°МжЧґжЙУеЉАдЄїй°µпЉМдЄїй°µдЄКжШЊз§ЇеЈ≤зїПжЈїеК†еИ∞жХ∞жНЃеЇУдЄ≠зЪДе≠¶еСШдњ°жБѓпЉМеЬ®еИЧи°®дЄКжѓПжЭ°иЃ∞ељХйГљжЬЙдЄ§дЄ™жУНдљЬжМЙйТЃпЉЪвАЬзЉЦиЊСвАЭжМЙйТЃзВєеЗїеРОдЉЪиЈ≥еИ∞дњЃжФєй°µпЉМеЕБиЃЄзФ®жИЈдњЃжФєе≠¶еСШдњ°жБѓпЉЫвАЬеИ†йЩ§вАЭжМЙйТЃдЄНзФ®жИСиѓідЇЖпЉМдЄАеОїдЄНе§НињФгАВ
дЄїй°µдЄАдЄЛжЦєзЪДеЇФзФ®з®ЛеЇПж†ПдЄ≠жЬЙдЄ§дЄ™жМЙйТЃпЉМвАЬеИЈжЦ∞вАЭеТМвАЬжЦ∞еҐЮвАЭпЉМеИЈжЦ∞дЄНзФ®иІ£йЗКпЉМжЦ∞еҐЮе∞±жШѓиЈ≥еИ∞жЦ∞еҐЮй°µйЭҐпЉМиЊУеЕ•жЦ∞е≠¶еСШдњ°жБѓпЉМзДґеРОдњЭе≠ШгАВ
еЕИзЬЛзЬЛеЗ†дЄ™жХИжЮЬеЫЊеРІгАВ

й¶ЦеЕИпЉМжИСдїђи¶БзФ®еИ∞дЄАдЄ™еЫЊж†ЗпЉМдЄНзФ®иЗ™еЈ±еБЪпЉМSDKиЗ™еЄ¶дЇЖдЄАе†ЖпЉМеЬ®ињЩйЗМеПѓдї•жЙЊеИ∞C:\Program Files (x86)\Microsoft SDKs\Windows Phone\v7.1\Icons\darkпЉМзЬЛеИ∞еЦЬ搥зЪДжЈїеК†еИ∞й°єзЫЃдЄ≠еН≥еПѓпЉМзФЯжИРжУНдљЬиЃЊдЄЇвАЬеЖЕеЃєвАЭпЉМвАЬе¶ВжЮЬиЊГжЦ∞еИЩе§НеИґвАЭгАВ

дЄїй°µпЉЪMainPage.xaml
<phone:PhoneApplicationPage
x:Class="MyApp.MainPage"
xmlns="http://schemas.microsoft.com/winfx/2006/xaml/presentation"
xmlns:x="http://schemas.microsoft.com/winfx/2006/xaml"
xmlns:phone="clr-namespace:Microsoft.Phone.Controls;assembly=Microsoft.Phone"
xmlns:shell="clr-namespace:Microsoft.Phone.Shell;assembly=Microsoft.Phone"
xmlns:d="http://schemas.microsoft.com/expression/blend/2008"
xmlns:mc="http://schemas.openxmlformats.org/markup-compatibility/2006"
mc:Ignorable="d" d:DesignWidth="480" d:DesignHeight="696"
FontFamily="{StaticResource PhoneFontFamilyNormal}"
FontSize="{StaticResource PhoneFontSizeNormal}"
Foreground="{StaticResource PhoneForegroundBrush}"
SupportedOrientations="Portrait" Orientation="Portrait"
shell:SystemTray.IsVisible="True">
<!--LayoutRoot жШѓеМЕеРЂжЙАжЬЙй°µйЭҐеЖЕеЃєзЪДж†єзљСж†Љ-->
<Grid x:Name="LayoutRoot" Background="Transparent">
<Grid.RowDefinitions>
<RowDefinition Height="Auto"/>
<RowDefinition Height="*"/>
</Grid.RowDefinitions>
<!--TitlePanel еМЕеРЂеЇФзФ®з®ЛеЇПзЪДеРНзІ∞еТМй°µж†ЗйҐШ-->
<StackPanel x:Name="TitlePanel" Grid.Row="0" Margin="12,17,0,28">
<TextBlock x:Name="ApplicationTitle" Text="жИСзЪДеЇФзФ®з®ЛеЇП" Style="{StaticResource PhoneTextNormalStyle}"/>
<TextBlock x:Name="PageTitle" Text="е≠¶еСШеИЧи°®" Margin="9,-7,0,0" Style="{StaticResource PhoneTextTitle1Style}"/>
</StackPanel>
<!--ContentPanel - еЬ®ж≠§е§ДжФЊзљЃеЕґдїЦеЖЕеЃє-->
<Grid x:Name="ContentPanel" Grid.Row="1" Margin="12,0,12,0">
<ListBox Name="stuList" HorizontalContentAlignment="Center">
<ListBox.ItemTemplate>
<DataTemplate>
<Grid Margin="2,10,2,2">
<Grid.RowDefinitions>
<RowDefinition Height="auto"/>
<RowDefinition Height="auto"/>
<RowDefinition Height="auto"/>
</Grid.RowDefinitions>
<Grid.ColumnDefinitions>
<ColumnDefinition Width="Auto" />
<ColumnDefinition />
<ColumnDefinition Width="Auto" />
</Grid.ColumnDefinitions>
<TextBlock Grid.Column="0"
Grid.Row="0"
Text="е≠¶еПЈпЉЪ"/>
<TextBlock Grid.Column="0"
Grid.Row="1"
Text="еІУеРНпЉЪ"/>
<TextBlock Grid.Column="0"
Grid.Row="2"
Text="зФµйВЃпЉЪ"/>
<TextBlock Grid.Column="1"
Grid.Row="0"
Text="{Binding StuNo}"/>
<TextBlock Grid.Column="1"
Grid.Row="1"
Text="{Binding Name}"/>
<TextBlock Grid.Column="1"
Grid.Row="2"
Text="{Binding Email}"/>
<StackPanel Orientation="Horizontal" Grid.Column="2" Grid.Row="1" Grid.RowSpan="2">
<Button BorderThickness="0"
Tag="{Binding StuNo}"
Click="OnDataEdit"
Margin="-5">
<Button.Content>
<Image Stretch="Uniform" Source="appbar.edit.rest.png"/>
</Button.Content>
</Button>
<Button Tag="{Binding StuNo}"
Click="OnDataDelete"
BorderThickness="0" Margin="-5">
<Button.Content>
<Image Stretch="Uniform" Source="appbar.delete.rest.png"/>
</Button.Content>
</Button>
</StackPanel>
</Grid>
</DataTemplate>
</ListBox.ItemTemplate>
<ListBox.ItemContainerStyle>
<Style TargetType="ListBoxItem">
<Setter Property="HorizontalContentAlignment" Value="Stretch"/>
</Style>
</ListBox.ItemContainerStyle>
</ListBox>
</Grid>
</Grid>
<phone:PhoneApplicationPage.ApplicationBar>
<shell:ApplicationBar>
<shell:ApplicationBarIconButton Text="еИЈжЦ∞" IconUri="appbar.refresh.rest.png" Click="onRefresh"/>
<shell:ApplicationBarIconButton Text="жЦ∞еҐЮ" IconUri="appbar.add.rest.png" Click="onNew"/>
</shell:ApplicationBar>
</phone:PhoneApplicationPage.ApplicationBar>
</phone:PhoneApplicationPage>
ListBoxзФ±дЇОжШЊз§ЇзЪДй°єзїУжЮДе§НжЭВпЉМжЙАдї•е∞±жРЮдЇЖдЄ™иЗ™еЃЪдєЙжХ∞жНЃж®°жЭњгАВ
MainPage.xaml.csдЄ≠зЪДдї£з†Бе¶ВдЄЛпЉЪ
using System;
using System.Collections.Generic;
using System.Linq;
using System.Net;
using System.Windows;
using System.Windows.Controls;
using System.Windows.Documents;
using System.Windows.Input;
using System.Windows.Media;
using System.Windows.Media.Animation;
using System.Windows.Shapes;
using Microsoft.Phone.Controls;
namespace MyApp
{
public partial class MainPage : PhoneApplicationPage
{
// жЮДйА†еЗљжХ∞
public MainPage()
{
InitializeComponent();
}
// зЉЦиЊС
private void OnDataEdit(object sender, RoutedEventArgs e)
{
Button btn = e.OriginalSource as Button;
if (btn != null)
{
string no = btn.Tag as string;
NavigationService.Navigate(new Uri("/EditPage.xaml?sno=" + no, UriKind.Relative));
}
}
// еИ†йЩ§жХ∞жНЃ
private void OnDataDelete(object sender, RoutedEventArgs e)
{
Button btn = e.OriginalSource as Button;
if (btn != null)
{
string sNo = btn.Tag.ToString();
using (MyDataContext dc = new MyDataContext())
{
Students stu = dc.Students.FirstOrDefault(s => s.StuNo == sNo);
if (stu != null)
{
dc.Students.DeleteOnSubmit(stu);
dc.SubmitChanges();
BindList();
}
}
}
}
private void onRefresh(object sender, EventArgs e)
{
BindList();
}
// жЦ∞еҐЮ
private void onNew(object sender, EventArgs e)
{
NavigationService.Navigate(new Uri("/AddPage.xaml", UriKind.Relative));
}
/// <summary>
/// жККжХ∞жНЃзїСеЃЪеИ∞ListBox
/// </summary>
private void BindList()
{
using (MyDataContext dc = new MyDataContext())
{
var res =
from s in dc.Students
select s;
this.stuList.ItemsSource = res.ToList();
}
}
protected override void OnNavigatedTo(System.Windows.Navigation.NavigationEventArgs e)
{
base.OnNavigatedTo(e);
BindList();
}
}
}
жЦ∞еҐЮй°µпЉЪAddPage.xaml
<phone:PhoneApplicationPage
x:Class="MyApp.AddPage"
xmlns="http://schemas.microsoft.com/winfx/2006/xaml/presentation"
xmlns:x="http://schemas.microsoft.com/winfx/2006/xaml"
xmlns:phone="clr-namespace:Microsoft.Phone.Controls;assembly=Microsoft.Phone"
xmlns:shell="clr-namespace:Microsoft.Phone.Shell;assembly=Microsoft.Phone"
xmlns:d="http://schemas.microsoft.com/expression/blend/2008"
xmlns:mc="http://schemas.openxmlformats.org/markup-compatibility/2006"
FontFamily="{StaticResource PhoneFontFamilyNormal}"
FontSize="{StaticResource PhoneFontSizeNormal}"
Foreground="{StaticResource PhoneForegroundBrush}"
SupportedOrientations="Portrait" Orientation="Portrait"
mc:Ignorable="d" d:DesignHeight="696" d:DesignWidth="480"
shell:SystemTray.IsVisible="True">
<!--LayoutRoot жШѓеМЕеРЂжЙАжЬЙй°µйЭҐеЖЕеЃєзЪДж†єзљСж†Љ-->
<Grid x:Name="LayoutRoot" Background="Transparent">
<Grid.RowDefinitions>
<RowDefinition Height="Auto"/>
<RowDefinition Height="*"/>
</Grid.RowDefinitions>
<!--TitlePanel еМЕеРЂеЇФзФ®з®ЛеЇПзЪДеРНзІ∞еТМй°µж†ЗйҐШ-->
<StackPanel x:Name="TitlePanel" Grid.Row="0" Margin="12,17,0,28">
<TextBlock x:Name="ApplicationTitle" Text="жИСзЪДеЇФзФ®з®ЛеЇП" Style="{StaticResource PhoneTextNormalStyle}"/>
<TextBlock x:Name="PageTitle" Text="жЦ∞еҐЮиЃ∞ељХ" Margin="9,-7,0,0" Style="{StaticResource PhoneTextTitle1Style}"/>
</StackPanel>
<!--ContentPanel - еЬ®ж≠§е§ДжФЊзљЃеЕґдїЦеЖЕеЃє-->
<Grid x:Name="ContentPanel" Grid.Row="1" Margin="12,0,12,0">
<StackPanel>
<TextBlock Text="е≠¶еПЈпЉЪ"/>
<TextBox Name="txtNo"/>
<TextBlock Text="еІУеРНпЉЪ" Margin="0,7,0,0"/>
<TextBox Name="txtName"/>
<TextBlock Margin="0,7,0,0" Text="EmailпЉЪ"/>
<TextBox Name="txtEmail"/>
</StackPanel>
</Grid>
</Grid>
<phone:PhoneApplicationPage.ApplicationBar>
<shell:ApplicationBar IsVisible="True">
<shell:ApplicationBarIconButton IconUri="appbar.save.rest.png" Text="дњЭе≠Ш" Click="onSave"/>
<shell:ApplicationBarIconButton IconUri="appbar.cancel.rest.png" Text="еПЦжґИ" Click="onCancel"/>
</shell:ApplicationBar>
</phone:PhoneApplicationPage.ApplicationBar>
</phone:PhoneApplicationPage>
AddPage.xaml.csдЄ≠зЪДдї£з†Бе¶ВдЄЛпЉЪ
using System;
using System.Collections.Generic;
using System.Linq;
using System.Net;
using System.Windows;
using System.Windows.Controls;
using System.Windows.Documents;
using System.Windows.Input;
using System.Windows.Media;
using System.Windows.Media.Animation;
using System.Windows.Shapes;
using Microsoft.Phone.Controls;
namespace MyApp
{
public partial class AddPage : PhoneApplicationPage
{
public AddPage()
{
InitializeComponent();
}
private void onCancel(object sender, EventArgs e)
{
//NavigationService.Navigate(new Uri("/MainPage.xaml", UriKind.Relative));
if (NavigationService.CanGoBack)
{
NavigationService.GoBack();
}
}
private void onSave(object sender, EventArgs e)
{
if (txtNo.Text == "")
{
MessageBox.Show("е≠¶еПЈдЄНиГљдЄЇз©ЇгАВ"); return;
}
if (txtName.Text == "")
{
MessageBox.Show("еІУеРНдЄНиГљдЄЇз©ЇгАВ"); return;
}
using (MyDataContext dc = new MyDataContext())
{
if (dc.Students.Where(c=>c.StuNo == txtNo.Text).Count() > 0)
{
MessageBox.Show("иЊУеЕ•зЪДе≠¶еПЈеЈ≤зїПе≠ШеЬ®гАВ"); return;
}
Students stu = new Students()
{
StuNo = txtNo.Text,
Name = txtName.Text,
Email = txtEmail.Text
};
dc.Students.InsertOnSubmit(stu);
dc.SubmitChanges();
}
//NavigationService.Navigate(new Uri("/MainPage.xaml", UriKind.Relative));
if (NavigationService.CanGoBack)
{
NavigationService.GoBack();
}
}
}
}
зЉЦиЊСй°µпЉЪEditPage.xaml
<phone:PhoneApplicationPage
x:Class="MyApp.EditPage"
xmlns="http://schemas.microsoft.com/winfx/2006/xaml/presentation"
xmlns:x="http://schemas.microsoft.com/winfx/2006/xaml"
xmlns:phone="clr-namespace:Microsoft.Phone.Controls;assembly=Microsoft.Phone"
xmlns:shell="clr-namespace:Microsoft.Phone.Shell;assembly=Microsoft.Phone"
xmlns:d="http://schemas.microsoft.com/expression/blend/2008"
xmlns:mc="http://schemas.openxmlformats.org/markup-compatibility/2006"
FontFamily="{StaticResource PhoneFontFamilyNormal}"
FontSize="{StaticResource PhoneFontSizeNormal}"
Foreground="{StaticResource PhoneForegroundBrush}"
SupportedOrientations="Portrait" Orientation="Portrait"
mc:Ignorable="d" d:DesignHeight="696" d:DesignWidth="480"
shell:SystemTray.IsVisible="True">
<!--LayoutRoot жШѓеМЕеРЂжЙАжЬЙй°µйЭҐеЖЕеЃєзЪДж†єзљСж†Љ-->
<Grid x:Name="LayoutRoot" Background="Transparent">
<Grid.RowDefinitions>
<RowDefinition Height="Auto"/>
<RowDefinition Height="*"/>
</Grid.RowDefinitions>
<!--TitlePanel еМЕеРЂеЇФзФ®з®ЛеЇПзЪДеРНзІ∞еТМй°µж†ЗйҐШ-->
<StackPanel x:Name="TitlePanel" Grid.Row="0" Margin="12,17,0,28">
<TextBlock x:Name="ApplicationTitle" Text="жИСзЪДеЇФзФ®з®ЛеЇП" Style="{StaticResource PhoneTextNormalStyle}"/>
<TextBlock x:Name="PageTitle" Text="зЉЦиЊСиЃ∞ељХ" Margin="9,-7,0,0" Style="{StaticResource PhoneTextTitle1Style}"/>
</StackPanel>
<!--ContentPanel - еЬ®ж≠§е§ДжФЊзљЃеЕґдїЦеЖЕеЃє-->
<Grid x:Name="ContentPanel" Grid.Row="1" Margin="12,0,12,0">
<StackPanel>
<TextBlock Text="е≠¶еПЈпЉЪ"/>
<TextBlock Name="txtNo"/>
<TextBlock Text="еІУеРНпЉЪ" Margin="0,7,0,0"/>
<TextBox Name="txtName"/>
<TextBlock Margin="0,7,0,0" Text="EmailпЉЪ"/>
<TextBox Name="txtEmail"/>
</StackPanel>
</Grid>
</Grid>
<phone:PhoneApplicationPage.ApplicationBar>
<shell:ApplicationBar IsVisible="True">
<shell:ApplicationBarIconButton IconUri="appbar.save.rest.png" Text="дњЭе≠Ш" Click="onSave"/>
<shell:ApplicationBarIconButton IconUri="appbar.cancel.rest.png" Text="еПЦжґИ" Click="onCancel"/>
</shell:ApplicationBar>
</phone:PhoneApplicationPage.ApplicationBar>
</phone:PhoneApplicationPage>
EditPage.xaml.csдЄ≠зЪДдї£з†Бе¶ВдЄЛпЉЪ
using System;
using System.Collections.Generic;
using System.Linq;
using System.Net;
using System.Windows;
using System.Windows.Controls;
using System.Windows.Documents;
using System.Windows.Input;
using System.Windows.Media;
using System.Windows.Media.Animation;
using System.Windows.Shapes;
using Microsoft.Phone.Controls;
namespace MyApp
{
public partial class EditPage : PhoneApplicationPage
{
public EditPage()
{
InitializeComponent();
}
private void onSave(object sender, EventArgs e)
{
if (txtName.Text == "" )
{
MessageBox.Show("еІУеРНдЄНиГљдЄЇз©ЇгАВ"); return;
}
using (MyDataContext dc = new MyDataContext())
{
Students stu = dc.Students.FirstOrDefault(s => s.StuNo == txtNo.Text);
if (stu != null)
{
stu.Name = txtName.Text;
stu.Email = txtEmail.Text;
dc.SubmitChanges();
}
}
//NavigationService.Navigate(new Uri("/MainPage.xaml", UriKind.Relative));
if (NavigationService.CanGoBack)
{
NavigationService.GoBack();
}
}
private void onCancel(object sender, EventArgs e)
{
//NavigationService.Navigate(new Uri("/MainPage.xaml", UriKind.Relative));
if (NavigationService.CanGoBack)
{
NavigationService.GoBack();
}
}
protected override void OnNavigatedTo(System.Windows.Navigation.NavigationEventArgs e)
{
base.OnNavigatedTo(e);
if (NavigationContext.QueryString.ContainsKey("sno"))
{
txtNo.Text = NavigationContext.QueryString["sno"];
using (MyDataContext dc = new MyDataContext())
{
Students stu = dc.Students.FirstOrDefault(s => s.StuNo == txtNo.Text);
if (stu != null)
{
txtName.Text = stu.Name;
txtEmail.Text = stu.Email;
}
}
}
}
}
}
дї£з†БиііеЃМдЇЖпЉМеЫ†дЄЇеЃЮеЬ®дЄНе§™е•љиІ£йЗКпЉМиАМдЄФдєЯдЄНзЃЧеЊИе§НжЭВпЉМзЫЄдњ°еРДдљНиГљзЬЛеЊЧжЗВгАВ
дљЖињЩжђ°зЪДдЊЛе≠РпЉМдї£з†БеЃЮеЬ®жЬЙзВєе§ЪпЉМжЙАдї•пЉМжИСдЉЪдЄКдЉ†еИ∞вАЬиµДжЇРвАЭдЄ≠пЉМе§ІеЃґеОїдЄЛиљљдєЛеРОеЖНзЬЛеРІпЉМеЬ®VSйЗМйЭҐзЬЛдї£з†БиИТжЬНдЄАдЇЫгАВ


- 2012-06-22 17:57
- жµПиІИ 689
- иѓДиЃЇ(0)
- жЯ•зЬЛжЫіе§Ъ
еПСи°®иѓДиЃЇ

зЫЄеЕ≥жО®иНР
иѓЊз®Лж¶Вињ∞ Windows¬Ѓ Phone MangoжПРдЊЫдЇЖдЄАзІНжЦ∞зЪДжЦєеЉПжЭ•е≠ШеВ®еТМзЃ°зРЖжВ®зЪДеЇФзФ®з®ЛеЇПзЪДзїУжЮДеМЦжХ∞жНЃ - Microsoft SQL Server Compact ...еИ©зФ®жЬђеЬ∞жХ∞жНЃеЇУеЉАеПС Windows Phone MangoеЇФзФ®з®ЛеЇПгАВ дЇЖиІ£ Tidy еЇФзФ®з®ЛеЇПеЃЮжЦљжЬђеЬ∞жХ∞жНЃеЇУгАВ
Windows Phone еЉАеПСдЄ≠дљњзФ®SQL CEжХ∞жНЃеЇУеЃЮдЊЛ
иЗ™еЈ±зХЩзЭАзЬЛ дєЯй°ЇдЊњеИЖдЇЂдЇЖ winphoneеѓєдЇОжЬђеЬ∞жХ∞жНЃеЇУзЪДжУНдљЬ
windows phone еЉАеПС еЬ®зЇњжХЩз®Л
Windows¬Ѓ Phone MangoжПРдЊЫдЇЖдЄАзІНжЦ∞зЪДжЦєеЉПжЭ•е≠ШеВ®еТМзЃ°зРЖжВ®зЪДеЇФзФ®з®ЛеЇПзЪДзїУжЮДеМЦжХ∞жНЃ - Microsoft SQL Server...жЬђжЦЗж°£дљњзФ® Tidy еЇФзФ®з®ЛеЇПжЭ•жЉФз§ЇеЬ® Windows¬Ѓ PhoneеЇФзФ®з®ЛеЇПдЄ≠дљњзФ®жЬђеЬ∞жХ∞жНЃеЇУгАВеЇФзФ®з®ЛеЇПзЃ°зРЖдЄОй°єзЫЃзЫЄеЕ≥зЪДдїїеК°
жЬђдє¶жЧ®еЬ®еИЖдЇЂеЉЇе§ІзЪДMicrosoftзЉЦз®ЛеЈ•еЕЈ(иѓЄе¶ВSilverlightгАБXNAеТМVisual Studio 2010 Express EditionдЄАз±ї)зЪДдљњзФ®ењГеЊЧпЉМдїЛзїНдЇЖе¶ВдљХдљњзФ®зО∞жЬЙзЪДC#еТМ.NETзЉЦз®ЛжКАиГљжЭ•еЉАеПСдЄАдЇЫWindows Phone 7еЇФзФ®з®ЛеЇПгАВжЬђдє¶дљЬиАЕеЫҐйШЯжОҐиЃ®дЇЖ...
windows phone еЉАеПСдє¶з±НеПКиµДжЦЩ
Developers are racing to discover how to develop for Windows Phone 7вАФand there is no quicker resource to help you get up to speed than Windows Phone 7 Recipes. This book covers all aspects of ...
windowsphoneеЉАеПСпЉЪз±їеЇУеТМж°ИдЊЛ[еАЯйЙі].pdf
iphoneеЉАеПСSQLiteжХ∞жНЃеЇУдљњзФ® зЃАеНХжЦєдЊњ
еЉАеПСиѓ≠и®АпЉЪC# з™ЧеП£ж°ЖжЮґпЉЪwindfrom жХ∞жНЃеЇУпЉЪmysql жХЩеЄИзФ®жИЈеѓЖз†Б zhanglaoshi 123456 е≠¶зФЯзФ®жИЈеѓЖз†Б qwe 123456 ж®°еЭЧдїЛзїН жХЩеЄИ зЩїйЩЖж®°еЭЧ еѓЉиИ™ж®°еЭЧ е≠¶зФЯзЃ°зРЖж®°еЭЧ иѓЈеБЗзЃ°зРЖж®°еЭЧ еЗЇеЛ§зЃ°зРЖж®°еЭЧ еѓЖз†БйЗНзљЃж®°еЭЧ йААеЗЇж®°еЭЧ ...
Windows PhoneеЉАеПС-XNAеЯЇз°А
2012еєі6жЬИ21жЧ•пЉМеЊЃиљѓж≠£еЉПеПСеЄГWindows Phone 8пЉМйЗЗзФ®еТМWindows 8зЫЄеРМзЪДWindows NTеЖЕж†ЄпЉМеРМжЧґдєЯйТИеѓєеЄВеЬЇзЪДWindows Phone 7.5еПСеЄГWindows Phone 7.8гАВзО∞жЬЙWindows Phone 7жЙЛжЬЇйГље∞ЖжЧ†ж≥ХеНЗзЇІиЗ≥Windows Phone 8гАВ 2014еєі3...
еЖЕеЃєжПРи¶Б: жЬђдє¶еѓєWindowsPhoneXNAжЄЄжИПеЉАеПСзЪДжµБз®ЛињЫи°МдЇЖиѓ¶зїЖзЪДиЃ≤иІ£пЉМеѓєеЕґж†ЄењГеЖЕеЃєеТМеЉАеПСжКАеЈІињЫи°МдЇЖжЈ±еЕ•зЪДиѓіжШОгАВ...жЬђдє¶ињШйТИеѓєWindowsPhone8зЪДжЦ∞зЙєжАІдї•еПКе¶ВдљХе∞ЖWindowsPhone7жЄЄжИПеРСWindowsPhone8дЄКињБзІїеБЪдЇЖиѓ¶зїЖзЪДиѓіжШОгАВ
[Packt Publishing] Windows Phone 8 жЄЄжИПеЉАеПСжХЩз®Л (иЛ±жЦЗзЙИ) [Packt Publishing] Windows Phone 8 Game Development (E-Book) вШЖ еЫЊдє¶ж¶Ви¶БпЉЪвШЖ A practical guide to creating games for the Windows Phone 8 ...
еЬ®еЉАеПСWindows PhoneеЇФзФ®з®ЛеЇПзЪДжЧґеАЩпЉМжИЦе§ЪжИЦе∞СдЉЪдЄОеЫЊзЙЗжЙУдЇ§йБУпЉМдЄЛйЭҐжАїзїУдЄЛWindows Phone дЄ≠е§ДзРЖеЫЊзЙЗзЪДдЄАдЇЫжКАеЈІ
дїОmonotouchеТМ.netеЉАеПСзОѓеҐГеИ∞objective-cеТМc#еЉАеПСиѓ≠и®АпЉМдїОеЯЇдЇОmonotouchињЫи°МiphoneеЉАеПСзЪДзЉЦз®ЛжЦєж≥ХеИ∞еЇФзФ®з®ЛеЇПзЪДеПСеЄГеТМйФАеФЃз≠ЙпЉМгАКiPhoneйЂШзЇІзЉЦз®ЛпЉЪдљњзФ®Mono TouchеТМ.NET/C#гАЛжґµзЫЦдЇЖеЯЇдЇОmonotouchињЫи°МiphoneеЇФзФ®з®ЛеЇП...
Windows Phone7жШѓеЊЃиљѓйЗНжЦ∞жЙУйА†windows mobileеУБзЙМдєЛеРОжО®еЗЇзЪДдЄАжђЊдЇІеУБгАВ
windows phone7 еЉАеПСзЪДж°ИдЊЛпЉМеЖЕжЬЙеЃМжХізЪДеЈ•з®Лй°єзЫЃгАВ
дїњWindows PhoneеНЪеЃҐеѓЉиИ™жЇРз†Б з®ЛеЇПдїЛзїНпЉЪ Windows Phone Blog MenuжШѓдЄАдЄ™SilverlightеѓЉиИ™жОІдїґпЉМзЬЛиµЈжЭ•еГПWindows Phone 7гАВ жОІдїґдЄ≠зЪДtilesйУЊжО•еИ∞webзЂЩзВєеЬ®дљ†зЪДеНЪеЃҐдЄ≠дљњзФ®ињЩдЄ™жОІдїґеПѓдї•и°®иЊЊдљ†еѓєWP7зЪДеЦЬзИ±гАВ Windows...