前段时间开发地图程序的时候,有自定义annotation的callouts的需求,看到这个需求的时候毫无头绪,在网上找资料找了很久,最后终于找到了方法,真是功夫不负有心人。网上已有人实现了这个功能,国外有人写了两篇博文专门介绍了,不过在国内这个网站好像已被屏蔽,需要才能浏览。这次在国外,我专门转到我的博客当中,以供国人观看。原文地址:part1, part2
原文是英文,我也没得时间翻译,不了解的地方直接看代码或给我留言。
---------------------------------------------------------------以下是转载-----------------------------------------------------------------------------
Part 1
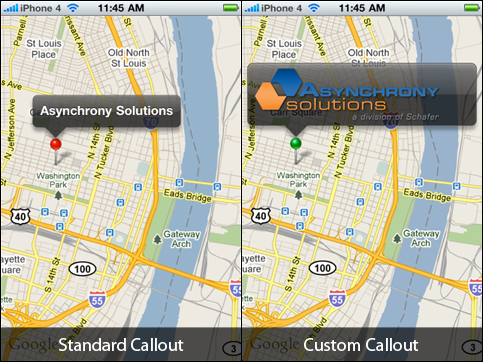
The iPhone’s Map Annotation Callouts are very useful for displaying small amounts of information when a map pin (annotation) is selected. One problem with the standard callouts present in iOS is the inability to change the height of the callout.
For example, you may want to display a logo or other image that is taller than the default callout. Or you may want to display an address and phone number on separate lines under the title. Both of these scenarios are impossible using the standard iOS callouts. There are many steps to building a good replacement callout with the proper look and behavior, but it can be done.
Part 1 (explained here) will explain how to build a custom map callout.
Part 2covers adding a button to the custom callout, which is not as simple as it sounds.
Put it on the map (and take it off)
For this example we will create two simple map annotations in the view controller – one will display the standard callout and the other will display the custom callout.
To place the “custom callout annotation” on the map we will add the custom annotation when the mapView calls themapView:didSelectAnnotationView:method, and we will remove the callout on the corresponding deselect method,mapView:didDeselectAnnotationView:. InmapView:viewForAnnotation:we return an instance of our custom MKAnnotationView subclass. Also, we disable the standard callout on the “parent” annotation view, which we will show the custom callout for.
Note: If building for iOS 3.x you will need to determine annotation selection another way (KVO, notifications, etc.).
Draw the callout (in the right place)
Now that we have the callout annotation placed on the map at the same coordinate as the parent annotation, we need to adjust the width and height of the callout view and adjust the center offset so that the view spans the entire width of the map and sits above the parent annotation. These calculations will be done duringsetAnnotation:because ourcontentHeight,offsetFromParent, andmapViewproperties should have been set by then.setNeedsDisplaywill also be called insetAnnotation:so that the callout is redrawn to match up with the annotation.
The shape of the callout bubble is basically a round-rectangle with a triangle that points to the parent annotation. Determining where that point should be is a matter of finding the x-coordinate of the parent relative to it and adding theoffsetFromParent.xproperty. LuckilyUIViewcontains the handyconvertPoint:fromView:method to handle the conversion between coordinate systems.
The steps to draw something similar to the standard callout are as follows:
- Create the shape (path) of the callout bubble with the point in the right position to match up with the parent
- Fill the path and add the shadow (adding the shadow here and then restoring the context prevents the shadow from being redrawn with each subsequent step)
- Apply a stroke to the path (more opaque than the fill)
- Create a round rectangle path to appear as the “gloss”
- Fill the gloss path with a gradient
- Convert the glass path to a “stroked path” (this will allow us to apply a gradient to the stroke)
- Apply a gradient (light to transparent) to the stroked path
In code:
Note: in iOS 3.2CGContextSetShadowWithColorreversed the direction of the y-axis offset, thus requiring theyShadowOffsetmethod seen above.
Let’s Add Some Content
To allow the addition of content we will create a content view as a read-only property, which will allow our consumers to access it. An additional method,prepareContentFramewill be added and invoked fromsetAnnotation:to set the content frame.
In our map view controller we will add the following code inmapView:viewForAnnotationto place an image in the callout and set the proper content height.
Animation
So far the callout looks similar to the native callout, but it is still lacking some of the behavior of the original. The callout needs to animate out from the parent annotation. Also, when the parent annotation is near the edge of the map view, the map should be adjusted to move the parent annotation in from the edge of the view.
The animation would be fairly simple if we could just adjust the frame of the callout view, however that will not scale the contents of the callout. Thus, we must use aCGAffineTransform. Apple has a good introducton toaffine transforms. The transform will need to both scale the view and translate the view to make it appear to grow out of the parent annotation. Scaling is simple – a value of 1 is normal size and other values act as a multiplier, so smaller values shrink the view and larger values expand the view. If the parent is off-center on the x-axis the callout needs to be translated to keep the point fixed directly over the parent annotation. Likewise the y-axis must be translated so that it appears that the callout grows upward from parent. We need to hold on to the frame for these calculations becauseself.framecannot be trusted during the animations. The calculations are done in the following two methods:
There will be three steps to the animation to create the bounce-like effect of the standard callout. We cannot begin the animation with a scale of 0 because a transformation matrix with a scale of 0 cannot be inverted.
- Grow from very small to slightly larger than the final size
- Shrink to slightly smaller than the final size
- Grow to the final size
These three steps will be separate animations chained together using UIView’ssetAnimationDidStopSelector:andsetAnimationDelegate:methods.
Shifting the Map
When the parent annotation is near the edge of the map, the map needs to be shifted so that the parent annotation and the callout remain a certain distance away from the edge of the view. To do this we need to calculate the distance to the edge of the view, the number of degrees latitude and longitude per pixel, and then set the new center point for the map. This adjustment should be made whendidMoveToSuperviewis called.
Conclusion
It takes a bit of work to replicate the iOS map annotation callout, but it is worth the effort if you need a larger space for content. You maydownload the full source codeto see a working example.
这是part1, part2马上奉上。
分享到:


相关推荐
iphone地图,点击annotation时,出现自定义cullouts
资源来自pypi官网。 资源全名:callouts-0.0.1-py3-none-any.whl
标注 该项目是使用AWS Connect发送绑定呼叫提醒并将确认记录保存在DynamoDB中的工具。 设置概述 部署ExcelLexBot。 将4个CalloutBotXXX.xlsx文件上传到ExcelLexBot的S3存储桶中。 您必须使用联系流程创建一个AWS ...
XEffects Tracking Callouts是一套由idustrialrevolution出品的用于FCPX跟踪标注插件,具有内置对象跟踪功能。包括跟踪模式和模板编辑模式, 只需选择一个区域,然后让插件分析对象的移动,以便为标题建立精确的跟踪...
自定义地图标签、注解,以及给地图标注添加按钮动作,控制地图标注出现的动作(是否需要降落效果)。 注意:请在Mac下解压使用
图像标注 一个简单的 gulp 应用程序,可让您轻松地向 wiki 图像... Numbers: [//]: # ({"file": "<filename>", "x": "xPos", "y": "yPos", "text": "Number (1-9)" }) 图片标题: [//]: # ({"file": "<filename.pn
伦敦消防大队标注
Once the model is built, you can create model views such as sections and callouts. Views are generated from the 3D physical model; consequently, changes made in one view automatically propagate ...
■ External callouts ■ Pro*C/C++ ■ XDK Oracle C++ Call Interface is supported with ■ Microsoft Visual C++ .NET 2005 8.0 ■ Microsoft Visual C++ .NET 2008 9.0 - OCCI libraries are installed ...
Added callouts to notify users that unpacked sprites are not supported in the Graphic Renderer. Added a new Pose struct to keep track of a point in space with a position and an orientation Added extra...
Comment over your screenshots with arrows, shapes, and callouts. Or walk people through workflows and answer questions with a quick screen recording. Add visuals to your documentation What if all ...
3 edition (July 27, 2006) 1 n: R8 ]4 l5 Q- D2 K7 V Language: English 6 ^: S: a% l# J ISBN: 0131856723 , \4 T& J# s: n: r# f+ a * @0 Q5 K5 H2 y0 U Book Info ! t/ [, k8 v; R0 a6 G 3 j2 v# q6 b3 M4 V3 ...
To adapt this guide for Linux/macOS, watch for callouts for Linux/macOS differences. What this guide doesn’t cover This guide is focused on an end-to-end continuous deployment experience for .NET ...
包括一个bin文件、header文件、controller_callouts文件、lib文件、samples(示例)文件、src文件; OpenVR 是由 Valve 公司开发的一套 VR 设备通用 API ,换而言之,不管是 Oculus Rift 或 HTC Vive 甚至是其他 VR...
Create drop caps, callouts, quotes, and alerts Who this book is for A software developer can use this book to learn CSS3 for the first time. A designer familiar with CSS3 can use this book to master ...
sized memory manager, user definable callouts on task creation, task deletion, task switch and system tick, supports TCB extensions, stack checking and, much more. I also added comments to just ...
9.B) Clusterware Callouts................186 Lab 10: Services and Failover..............189 10.A) Install Instant Client................190 10.B) Service Failover........................194 10.C) ...