Using Google Maps in Android
来源:http://mobiforge.com/developing/story/using-google-maps-android?page=1

Google Maps is one of the many applications bundled with the Android platform. In addition to simply using the Maps application, you can also embed it into your own applications and make it do some very cool things. In this article, I will show you how to use Google Maps in your Android applications and how to programmatically perform the following:
- Change the views of Google Maps
- Obtain the latitude and longitude of locations in Google Maps
- Perform geocoding and reverse geocoding
- Add markers to Google Maps
Creating the Project
Using Eclipse, create a new Android project and nameGoogleMapsas shown in Figure 1.
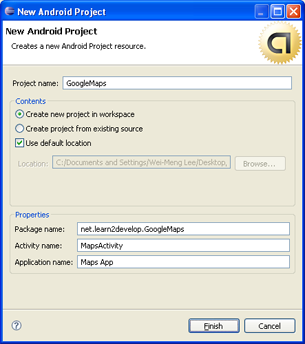
Figure 1Creating a new Android project using Eclipse
Obtaining a Maps API key
Beginning with the Android SDK release v1.0, you need to apply for a free Google Maps API key before you can integrate Google Maps into your Android application. To apply for a key, you need to follow the series of steps outlined below. You can also refer to Google's detailed documentation on the process athttp://code.google.com/android/toolbox/apis/mapkey.html.
First, if you are testing the application on the Android emulator, locate the SDK debug certificate located in the default folder of"C:/Documents and Settings/<username>/Local Settings/Application Data/Android". The filename of the debug keystore isdebug.keystore. For deploying to a real Android device, substitute thedebug.keystorefile with your own keystore file. In a future article I will discuss how you can generate your own keystore file.
For simplicity, copy this file (debug.keystore) to a folder inC:/(for example, create a folder called "C:/Android").
Using the debug keystore, you need to extract its MD5 fingerprint using theKeytool.exeapplication included with your JDK installation. This fingerprint is needed to apply for the free Google Maps key. You can usually find theKeytool.exefrom the "C:/Program Files/Java/<JDK_version_number>/bin" folder.
Issue the following command (see also Figure 2) to extract the MD5 fingerprint.
keytool.exe -list -alias androiddebugkey -keystore "C:/android/debug.keystore" -storepass android -keypass android
Copy the MD5 certificate fingerprint and navigate your web browser to:http://code.google.com/android/maps-api-signup.html. Follow the instructions on the page to complete the application and obtain the Google Maps key.
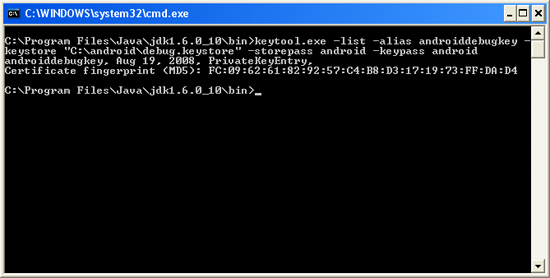
Figure 2Obtaining the MD5 fingerprint of the debug keystore
To use the Google Maps in your Android application, you need to modify yourAndroidManifest.xmlfile by adding the<uses-library>element together with theINTERNETpermission:
Displaying the Map
To display the Google Maps in your Android application, modify themain.xmlfile located in theres/layoutfolder. You shall use the<com.google.android.maps.MapView>element to display the Google Maps in your activity. In addition, let's use the<RelativeLayout>element to position the map within the activity:
Notice from above that I have used the Google Maps key that I obtained earlier and put it into theapiKeyattribute.
In theMapsActivity.javafile, modify the class to extend from theMapActivityclass, instead of the normalActivityclass:
Observe that if your class extends theMapActivityclass, you need to override theisRouteDisplayed()method. You can simply do so by setting the method to return false.
That's it! That's all you need to do to display the Google Maps in your application. PressF11in Eclipse to deploy the application onto an Android emulator. Figure 3 shows the Google map in all its glory.
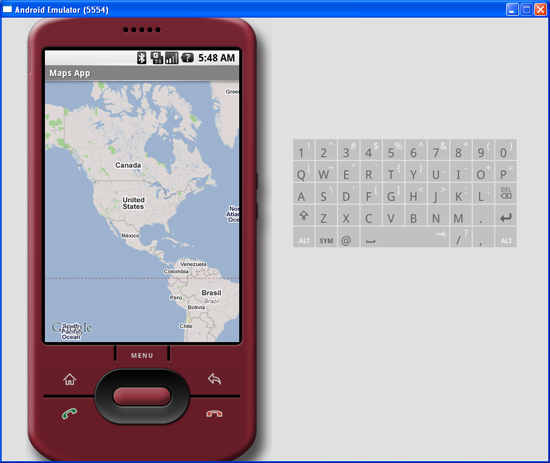
Figure 3Google Maps in your application
At this juncture, take note of a few troubleshooting details. If your program does not run (i.e. it crashes), then it is likely you forgot to put the following statement in yourAndroidManifest.xmlfile:
If your application manages to load but you cannot see the map (all you see is a grid), then it is very likely you do not have a valid Map key, or that you did not specify theINTERNETpermission:
Displaying the Zoom View
The previous section showed how you can display the Google Maps in your Android device. You can drag the map to any desired location and it will be updated on the fly. However, observe that there is no way to zoom in or out from a particular location. Thus, in this section, you will learn how you can let users zoom into or out of the map.
First, add a<LinearLayout>element to themain.xmlfile as shown below:
You will use the<LinearLayout>element to hold the two zoom controls in Google Maps (you will see this shortly).
In theMapsActivity.javafile, add the following imports:
import com.google.android.maps.MapView.LayoutParams;
import android.view.View;
import android.widget.LinearLayout;
and add the following code after the linesetContentView(R.layout.main);
The completeMapsActivity.javafile is given below:
Basically, you obtain theMapViewinstance on the activity, obtain its zoom controls and then add it to theLinearLayoutelement you added to the activity earlier on. In the above case, the zoom control will be displayed at the bottom of the screen. When you now pressF11in Eclipse, you will see the zoom controls when you touch the map (see Figure 4).
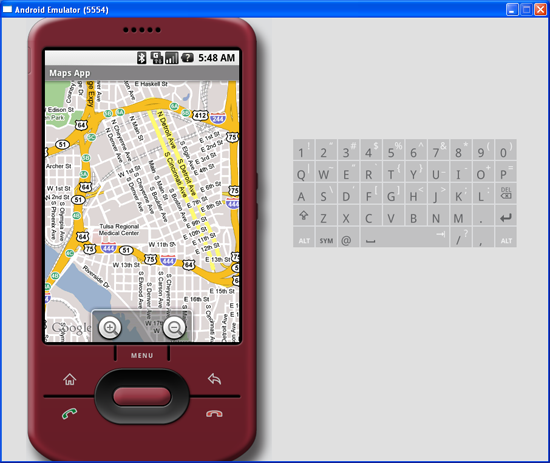
Figure 4Using the zoom controls in Google Maps
Using the zoom control, you can zoom in or out of a location by simply touching the "+ or "-" buttons on the screen.
Alternatively, you can also programmatically zoom in or out of the map using thezoomIn()andzoomOut()methods from theMapControllerclass:
In the above code, when the user presses the number 3 on the keyboard the map will zoom in into the next level. Pressing number 1 will zoom out one level.
Changing Views of the Map
By default, the Google Maps displays in the map mode. If you wish to display the map in satellite view, you can use thesetSatellite()method of theMapViewclass, like this:
You can also display the map in street view, using thesetStreetView()method:
Figure 5 shows the Google Maps displayed in satellite and street views, respectively.
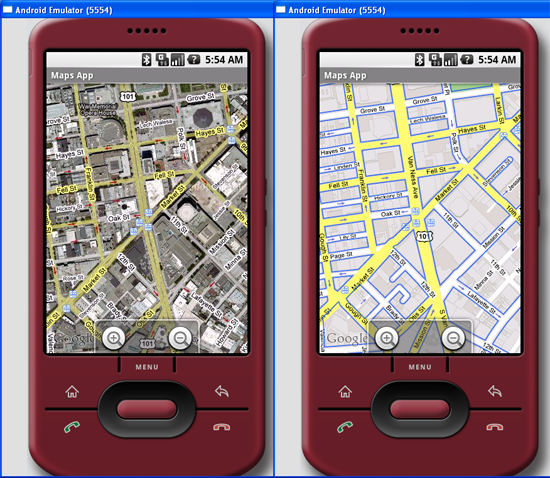
Figure 5Displaying Google Maps in satellite and street views
Displaying a Particular Location
Be default, the Google Maps displays the map of the United States when it is first loaded. However, you can also set the Google Maps to display a particular location. In this case, you can use theanimateTo()method of theMapControllerclass.
The following code shows how this is done:
In the above code, you first obtain a controller from theMapViewinstance and assign it to aMapControllerobject (mc). You use aGeoPointobject to represent a geographical location. Note that for this class the latitude and longitude of a location are represented in micro degrees. This means that they are stored as integer values. For a latitude value of 40.747778, you need to multiply it by 1e6 to obtain 40747778.
To navigate the map to a particular location, you can use theanimateTo()method of theMapControllerclass (an instance which is obtained from the MapView object). ThesetZoom()method allows you to specify the zoom level in which the map is displayed. Figure 6 shows the Google Maps displaying the map of Singapore.
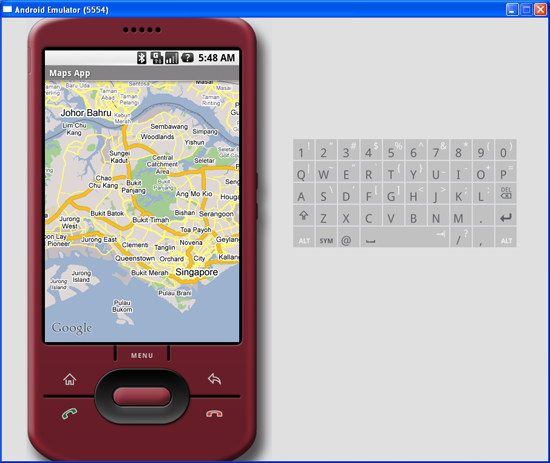
Figure 6Navigating to a particular location on the map
Adding Markers
Very often, you may wish to add markers to the map to indicate places of interests. Let's see how you can do this in Android. First, create a GIF image containing a pushpin (see Figure 7) and copy it into theres/drawablefolder of the project. For best effect, you should make the background of the image transparent so that it does not block off parts of the map when the image is added to the map.
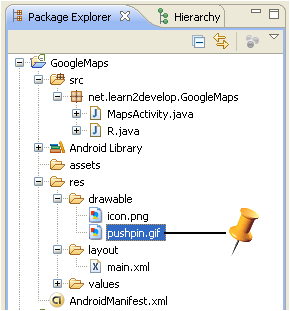
Figure 7Adding an image to the res/drawable folder
To add a marker to the map, you first need to define a class that extends theOverlayclass:
In theMapOverlayclass that you have defined, override thedraw()method so that you can draw the pushpin image on the map. In particular, note that you need to translate the geographical location (represented by aGeoPointobject, p) into screen coordinates.
As you want the pointed tip of the push pin to indicate the position of the location, you would need to deduct the height of the image (which is 50 pixels) from the y-coordinate of the point (see Figure 8) and draw the image at that location.
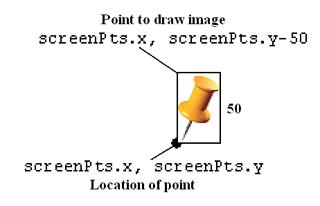
Figure 8Adding an image to the map
To add the marker, create an instance of theMapOverlapclass and add it to the list of overlays available on theMapViewobject:
Figure 9 shows how the pushpin looks like when added to the map.
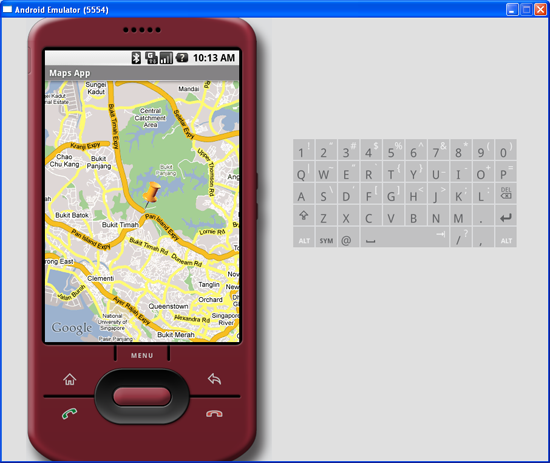
Figure 9Adding a marker to the map
Getting the Location that was touched
After using Google Maps for a while, you may wish to know the latitude and longitude of a location corresponding to the position on the screen that you have just touched. Knowing this information is very useful as you can find out the address of a location, a process known as Geocoding (you will see how this is done in the next section).
If you have added an overlay to the map, you can override the onTouchEvent() method within theOverlayclass. This method is fired every time the user touches the map. This method has two parameters -MotionEventandMapView. Using theMotionEventparameter, you can know if the user has lifted his finger from the screen using thegetAction()method. In the following code, if the user has touched and then lifted his finger, you will display the latitude and longitude of the location touched:
Figure 10 shows this in action.

Figure 10Displaying the latitude and longitude of a point touched on the map
Geocoding and Reverse Geocoding
If you know the latitude and longitude of a location, you can find out its address using a process known as Geocoding. Google Maps in Android supports this via theGeocoderclass. The following code shows how you can find out the address of a location you have just touched using thegetFromLocation()method:
Figure 11 shows the above code in action.
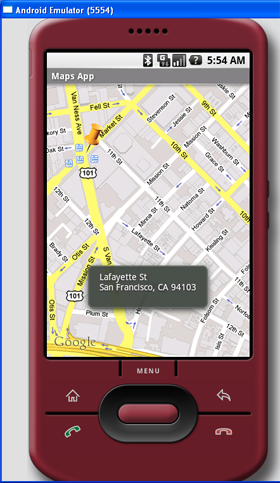
Figure 11Performing Geocoding in Google Maps
If you know the address of a location but want to know its latitude and longitude, you can do so via reverse-Geocoding. Again, you can use theGeocoderclass for this purpose. The following code shows how you can find the exact location of the Empire State Building by using thegetFromLocationName()method:
Once the location is found, the above code navigates the map to the location. Figure 12 shows the code in action.
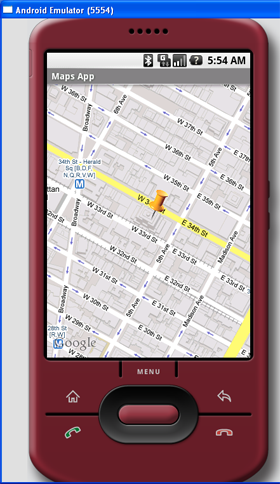
Figure 12Navigating to the Empire State Building
Summary
In this article, you have learnt a few tricks for the Google Maps in Android. Using Google Maps, there are many interesting projects you can work on, such as geo-tagging, geo-tracking, etc. If you have cool ideas on building cool location-based services, share with us in the comments box below. Have fun!
分享到:


相关推荐
In addition to covering general Android development techniques, the book also includes Google Play specific topics such as implementing maps using the Google Maps Android API, in-app billing and ...
In addition to covering general Android development techniques, the book also includes Google Play specific topics such as implementing maps using the Google Maps Android API, in-app billing and ...
android使用谷歌地图(Android uses Google Maps),利用高德地图加载瓦片图层(Using Gaud map to load tile layer)
Because using Google Play Services to show a Google Map may be overkill, or simply because Google Play Services are not available (Amazon, I'm looking at you!). How? Most of the official API is ...
O'Reilly.-.Using Google App Engine (2009).pdf Packtpub.-.Google App Engine Java and GWT Application Development (2010).pdf API: Apress.-.Beginning Google Maps API V3 (2009).pdf Googlecode.-.Google ...
In addition to covering general Android development techniques, the book also includes Google Play specific topics such as implementing maps using the Google Maps Android API, and submitting apps to ...
android-app-using-google-maps
Android-Google-Maps-Directions-API 演示如何使用Android上的Google Maps Directions API在地图上生成折线。 关于如何使用Java在Android上使用Google Maps Directions API的文档很少。 此存储库将帮助您在应用中...
* Create user interfaces using both the Android Widget framework and the built-in WebKit-powered web browser components * Use scripting with BeanShell * Work with menu inflation, fonts, SDK tools, ...
•Google Maps, Mapbox classic, ArcGIS, Nokia Maps (HERE.com), Virtual Earth (Bing Maps), Open Street Maps, and many others (16 providers, 88 map types); •Multilingual map with the ability to create ...
* Implement GPS, Google Maps, Google Earth, and GTalk * Build interactive SQLite databases, calendars, and notepads * Test applications using the Android Emulator and Debug Bridge
There're several examples about dependencies and libraries (ActionBar Sherlock, Admob Ads, Google Play SDK, Google Maps v2 Api) Set up a local Maven repositories and build .aar libraries. Learn about ...
implementation 'com.mahc.custombottomsheetbehavior:googlemaps-like:0.9.1' } Usage [] Wiki under construction but still with some info already, until I complete it you can take a look at the example ...
Using location-related services such as the Google Maps API Building faster applications with native code Providing backup and restore with the Android Backup Manager Testing and debugging apps ...
That includes all the new APIs introduced in Android 3 and 4, including building for tablets, using the Action Bar, Wi-Fi Direct, NFC Beam, and more. Shows experienced developers how to create ...
Turn your ideas into elegant and powerful mobile applications using the latest Android Studio for the Android Lollipop platform About This Book Design and customize GUI using material design to ...
Chapter 13: Maps, Geocoding, and Location-Based Services Using Location-Based Services Using the Emulator with Location-Based Services Selecting a Location Provider Finding Your Current Location Best ...
Native Google Maps, Geocoding, and Location-Based Services 6 Background Services 6 SQLite Database for Data Storage and Retrieval 7 Shared Data and Interapplication Communication 7 P2P Services ...
world and fun mobile apps using the new Android SDK 4 (Ice Cream Sandwich), which unifies Gingerbread for smartphones, Honeycomb for tablets and augments further with Google TV and more. This ...
Pro Android 5 shows you how to build real-world and fun mobile apps using the Android 5 SDK. This book updates the best-selling Pro Android and covers everything from the fundamentals of building apps...